Design Custom Embroidery Patches: Artisan’s Guide
A great patch is a collaboration between digital art and physical physics. To create something truly lasting, you have to think in thread, not just pixels. Learning how to design a custom patch for embroidery is the bridge between a digital concept and a tangible piece of craftsmanship you can hold in your hand. You probably already know that embroidery offers a premium, tactile feel that other mediums simply can’t match. However, it’s natural to feel a bit overwhelmed by technical choices like file formats or whether a merrowed border is right for your specific shape.
I understand the frustration of seeing a beautiful logo become unreadable because the text was just a hair too small. This guide simplifies the process, providing you with the essential design principles and professional secrets used by boutique artisans here in Houston. You’ll learn how to choose the right materials, understand the vital role of expert digitizing, and follow a clear checklist for success. By the end, you’ll have the confidence to transform your artwork into a high-quality embroidered patch that carries your story with precision and excellence.
Key Takeaways
- Learn why simplifying your digital logo is essential for thread-based art and how to avoid the “thin line” trap that can compromise a design’s clarity.
- Discover how to select the perfect combination of borders and backings to ensure your custom patches are as durable as they are beautiful.
- Understand the vital role of professional digitizing, the technical process that maps your vision into precise stitch paths for the embroidery machine.
- Master how to design a custom patch for embroidery by collaborating with a local Houston artisan who prioritizes boutique quality over mass production.
- Gain a clear, actionable checklist to transform your creative concepts into tangible, professional-grade items that carry your unique story.
Understanding the Anatomy of an Embroidered Patch
A custom patch is far more than a simple logo on fabric. It’s a self-contained piece of art, meticulously constructed to be versatile, durable, and meaningful. At our Houston boutique, we view these items as vessels for stories. Whether you’re representing a corporate brand or a personal milestone, the physical structure of the patch dictates how that story is told. When you’re learning how to design a custom patch for embroidery, the first step is visualizing it as a physical object rather than a flat image on a screen.
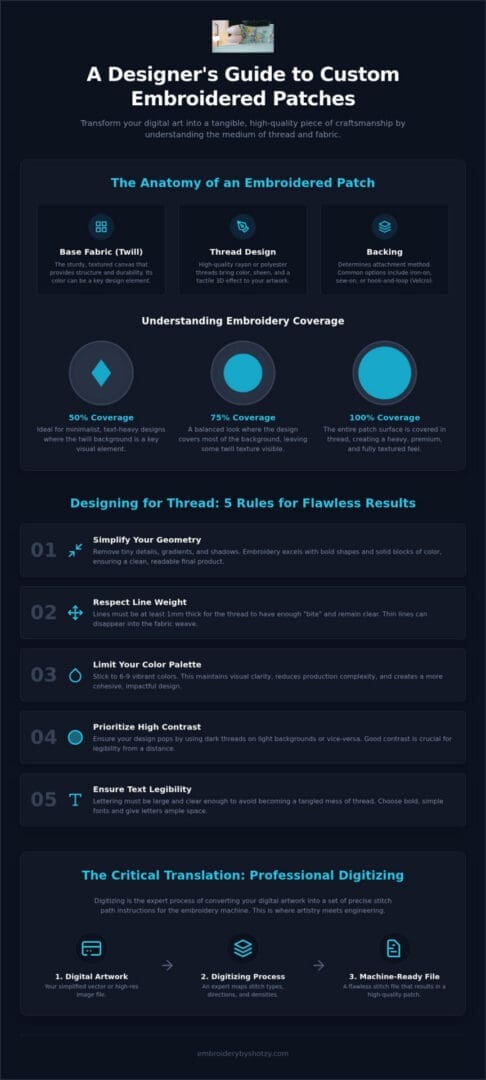
Every professional patch consists of three fundamental layers. The base fabric, typically a sturdy twill, provides the canvas. The thread design brings the artwork to life with color and texture. Finally, the backing determines how the patch will interact with the world, whether it’s ironed on, sewn, or attached via Velcro. Understanding these layers is the foundation of how to design a custom patch for embroidery that feels substantial and looks professional.
The amount of thread used, known as embroidery coverage, significantly alters the final aesthetic and cost. You generally choose between three levels:
- 50% Coverage: The twill background is highly visible. This is ideal for minimalist designs or text-heavy logos where the fabric color is part of the brand identity.
- 75% Coverage: Most of the background is covered, leaving only small sections of twill visible. This offers a balanced, textured look.
- 100% Coverage: The entire surface is covered in stitches. This results in a heavy, premium feel with no base fabric showing through.
The Base: Choosing Your Twill Background
Twill is the industry standard for a reason. Its distinct diagonal weave provides a textured, durable surface that holds up against the high tension of embroidery needles. Choosing a background color that complements your thread palette is a strategic move. If you select 50% or 75% coverage, that twill color becomes a primary design element. It’s a cost-effective way to add color without increasing the stitch count, making it a favorite for Houston businesses looking for high-impact bulk orders.
The Thread: Bringing Color and Dimension
Threads are the ink of the embroidery world. We often use high-quality rayon or polyester threads because they offer a sophisticated sheen that catches the light beautifully. The secret to a “raised” professional feel lies in stitch density. Higher density creates a lush, thick surface that resists fraying. By varying the thread direction, or slant, an artisan can create a subtle 3D effect that makes certain elements of your design pop. This meticulous attention to detail transforms a simple logo into a tactile experience.
Designing for Thread: 5 Rules for High-Impact Patch Art
Designing for thread is an exercise in intentionality. While a digital screen can render infinite detail, a needle and thread require clear paths to follow. Mastering how to design a custom patch for embroidery means learning to distill your vision into its most potent form. High-impact art isn’t about how much you can cram into a three-inch circle; it’s about how effectively you can communicate a brand’s soul through texture and color. In our Houston studio, we’ve found that the most memorable patches are those that embrace the physical nature of the medium.
To ensure your design translates perfectly from the screen to the stitch, follow these five essential rules:
- Simplify the geometry: Remove tiny details that will get lost in the fabric weave.
- Respect the 1mm line weight: Lines need a minimum thickness of 1mm to ensure the thread has enough “bite” to remain visible.
- Limit the color palette: Stick to 6 to 9 vibrant colors to maintain visual clarity and reduce production complexity.
- Prioritize high contrast: Use dark threads on light backgrounds to make your central icons pop.
- Size text for legibility: Lettering must be large enough to avoid becoming a tangled nest of thread.
Simplifying Your Logo for Embroidery
Your website logo might look stunning with its soft gradients and subtle drop shadows, but embroidery doesn’t replicate shadows well. These elements often translate into muddy, disorganized stitch patterns that lack definition. When considering how to design a custom patch for embroidery in 2026, focus on solid blocks of color. Consolidating your palette doesn’t mean losing your identity; it means choosing the most iconic, simplified version of your brand. Bold, high-contrast shapes are far more effective at a small scale than intricate illustrations. If you find your design feels cluttered, our artisans in Houston can help you refine a “patch version” of your logo at Embroidery By Shotzy.
Typography and Font Choice
Text is often the most challenging element of patch design. Delicate scripts and serif fonts with thin “feet” can easily vanish or become illegible once the needle starts moving. We recommend using clean, sans-serif fonts whenever possible. The 0.25-inch rule is your best friend here. Any text smaller than a quarter-inch in height is a significant risk for legibility. While some specialized machines can handle text down to 4mm, staying at 0.25 inches ensures your message is readable from a distance. Don’t forget about kerning; giving your letters extra room to breathe prevents the threads from overlapping and creating a blurred effect.
Selecting Technical Specs: Borders, Backings, and Shapes
The technical specifications you choose are the silent architects of your patch’s durability and character. While the artwork captures the eye, the borders and backings determine how that piece of art survives the elements. Learning how to design a custom patch for embroidery involves more than just aesthetics; it requires an understanding of how the finished product will be handled and worn. In our Houston studio, we treat these choices as a collaborative effort to ensure your vision remains intact whether it’s pinned to a flight suit or ironed onto a corporate polo.
Beyond the materials, the physical dimensions play a vital role in both design scaling and pricing. To calculate the size of your patch, use the standard industry formula: add the length and the width together, then divide by two. This average gives you the “patch size” used for production. For example, a 2-inch by 4-inch rectangle is considered a 3-inch patch. Understanding this helps you scale your design elements proportionally, ensuring that the details we discussed in the previous section remain legible.
Merrowed vs. Hot-Cut Borders
The border is the frame that keeps your story from fraying at the edges. A Merrowed border is the classic choice, featuring a thick, wrapped thread that rolls over the edge of the fabric. It provides a heavy, traditional look perfect for circles, squares, and standard shields. However, if your design features a unique silhouette or complex points, a Hot-Cut (or Laser-Cut) edge is superior. This method uses heat to seal the fabric exactly to the shape of your artwork, allowing for intricate outlines that a Merrowed machine cannot reach. For a minimalist, seamless look, you might even choose a “no-border” finish, which is ideal for permanent sew-on applications where the patch should blend into the garment.
Backing Options: Iron-on, Sew-on, and Tactical
Choosing a backing is about understanding the garment’s journey. Iron-on backings are the most popular choice for Houston organizations because they allow for quick, easy application on cotton and polyester blends. For items that face heavy wear or high heat, like leather jackets or denim vests, a traditional sew-on backing is the “legacy” choice for maximum permanence. If your team requires versatility, hook-and-loop (Velcro) backings are essential. These are common for tactical gear, interchangeable branding on embroidered bags, or flight suits where patches need to be swapped frequently. Matching the right backing to your specific use case ensures your custom work remains a lasting part of the wearer’s story.
The Digitizing Process: Turning Your Vision into Machine-Readable Reality
Digitizing is the specialized craft of translating a visual image into a language an embroidery machine can speak. While your computer screen displays a logo as a collection of static pixels, a professional embroidery machine requires a set of precise commands. It needs to know exactly where to drop the needle, which direction to pull the thread, and how much tension to apply. Understanding this technical bridge is a core part of how to design a custom patch for embroidery that maintains its integrity over time. A standard JPEG or PNG simply doesn’t contain this movement data, which is why a manual conversion process is essential for boutique-quality results.
At our Houston studio, we treat the one-time logo digitizing fee as a long-term investment in your brand’s legacy. Unlike mass-production facilities that rely on generic, automated software, we meticulously map every stitch path by hand. This ensures that your file is optimized for the specific item it’ll live on. A design digitized for a soft baby blanket requires different tension and pathing than one destined for a structured hat or heavy-duty embroidered scrubs. Once this master file is created, it’s yours to use for years, ensuring consistent excellence across every order.
Why Manual Digitizing Beats Automated Tools
Automated “instant” digitizing tools often create messy, inefficient paths that lead to frequent thread breaks and puckered fabric. Manual pathing allows an artisan to dictate a logical flow for the machine, ensuring it moves efficiently from one section to the next. We also focus on underlay stitches, which act as a stabilizing foundation. Without a proper underlay, your design can “sink” into the fabric weave, losing its crispness. Finally, we account for “push and pull” compensation. Fabric is a living material that shifts under the needle; a skilled digitizer adjusts the digital file to counteract this movement, so your finished patch remains perfectly symmetrical.
Preparing Your Files for a Professional
To get the best results, providing high-quality source files is vital. Vector formats like AI, EPS, or PDF are the gold standard because they allow us to scale your artwork without losing any clarity. If you only have a raster file, such as a high-resolution PNG, ensure it’s clear and large enough for us to see every detail. Accuracy in color is another priority. We recommend providing Pantone codes so we can match your brand identity to specific thread spools with total precision. Before we cast the first stitch, you’ll receive a digital proof for approval. This collaborative step ensures the transition from screen to thread meets your exact expectations. If you’re ready to see your logo transformed, you can start your project with our expert digitizing services today.
Why Local Craftsmanship Matters for Your Custom Houston Patches
Selecting the right production partner is the final, most critical step in learning how to design a custom patch for embroidery. While digital tools offer convenience, they often lack the local accountability and artisanal insight that a Houston specialist provides. Working with a local partner means your project isn’t just another number in an international queue. Instead, it’s a collaborative effort where your specific needs for corporate branding or personal gifts are understood within the context of our vibrant city. We understand the local climate and the specific durability requirements for Houston businesses, ensuring your patches last as long as the stories they represent.
The difference between a mass produced patch and a boutique finished item is immediately apparent in the hand feel and visual depth. Understanding how to design a custom patch for embroidery is only half the battle; the other half is finding an expert who can execute that design with precision. Large scale factories often prioritize speed over stitch density, resulting in patches that feel flimsy or look “flat.” By choosing a local artisan, you gain a level of quality control that automated services simply cannot match. Every thread is inspected, and every border is finished with the meticulous care your vision deserves. This commitment to excellence ensures that whether you are ordering bulk patches for a team or a single custom piece, the result is a professional reflection of your standards.
The Boutique Experience at Embroidery By Shotzy
At Embroidery By Shotzy, we believe that every project is an opportunity to create a lasting legacy. Our boutique approach means we offer meticulous attention to detail that goes far beyond a simple transaction. We guide you through the technical choices we have discussed in this guide, from choosing the right thread sheen to selecting the most durable backing for your specific garment. Supporting a Houston artisan since 2014 builds community and guarantees that the person handling your project is as invested in its success as you are. We take pride in our expertise with high stitch count designs and our ability to handle complex logos with precision, avoiding the generic results of faceless online tools.
Ready to Start Your Project?
Transforming your ideas into a physical reality is a straightforward, rewarding process. When you are ready to begin, providing a clear version of your artwork and a brief description of your intended use will help us give you the most accurate guidance. Whether you need patches for custom polos, embroidered hats, or specialized bags, we are here to act as your creative partner. To get the fastest response for your inquiry, please include your desired quantity, patch size, and any specific backing requirements. You can bring your vision to life with Embroidery By Shotzy and experience the difference that local craftsmanship makes.
Bringing Your Creative Vision to Life
Creating a custom patch is about turning a digital idea into a tangible legacy. You now understand that successful design relies on simplifying your artwork for the needle and choosing technical specs that match your garment’s journey. Mastering how to design a custom patch for embroidery is a collaborative process that bridges the gap between creative vision and physical craftsmanship. It’s an art form that rewards patience and attention to detail.
Since 2014, our Houston boutique has focused on this meticulous intersection of art and industry. We specialize in high-quality logo digitizing to ensure your design never loses its clarity in the transition from screen to thread. Whether you’re branding a local team or creating a unique personal gift, working with a local expert ensures your story is told with precision. You’re ready to take the next step and see your vision take shape. Start your custom patch design with Houston’s embroidery experts today. We’re excited to help you create something truly exceptional.
Frequently Asked Questions
What is the best file format for custom embroidery patch designs?
Vector files like AI, EPS, or PDF are the gold standard for patch design. These formats allow us to scale your artwork infinitely without any loss of clarity or pixelation. While we can work with high-resolution raster files like a clean PNG, vectors provide the most precise foundation for manual digitizing. This clarity is vital when we map out the specific stitch paths that will bring your brand to life with professional excellence.
Can I turn a photo into an embroidered patch?
You can certainly turn a photograph into a patch, but it requires significant simplification. Embroidery machines cannot reproduce the millions of colors and subtle gradients found in a standard photo. Instead, an artisan must distill the image into distinct blocks of color and clear outlines. This process ensures the finished piece retains the essence of your photo while remaining legible and durable in a thread-based medium that feels substantial.
What is the minimum size for readable text on a patch?
Lettering should be at least 0.25 inches in height to remain readable. While some specialized equipment can handle text as small as 4mm, staying at a quarter-inch ensures the threads don’t overlap and create a blurred mess. When you’re learning how to design a custom patch for embroidery, prioritizing font size is the best way to prevent your message from becoming a tangled nest of thread. Clear, sans-serif fonts work best.
How do I choose between an iron-on and a sew-on patch?
Your choice depends entirely on the garment’s material and intended use. Iron-on backings are incredibly popular for cotton and polyester blends because they offer a quick, heat-activated bond. However, for heavy-duty items like leather jackets or denim vests, a traditional sew-on patch is the superior choice for permanent security. If you need to swap branding frequently on items like embroidered bags, consider a hook-and-loop backing for maximum versatility and convenience.
Why do I have to pay a digitizing fee for my logo?
The digitizing fee covers the technical labor of manually mapping every single stitch path in your logo. Unlike generic automated tools, our boutique process in Houston ensures the machine moves efficiently to prevent thread breaks and puckering. This is a one-time investment in a high-quality file that you can reuse for years. It guarantees that your design is optimized specifically for the fabric it will live on, from scrubs to hats.
How long does it take to get custom patches made in Houston?
Working with a local Houston boutique typically offers a significant speed advantage over international providers. Because we operate right here in the city, you avoid the long shipping delays and customs hurdles associated with overseas manufacturing. While specific timelines vary based on the complexity of your design and order volume, local craftsmanship ensures a reliable, transparent schedule. This proximity allows for better communication and a faster path to your finished product.
What is a merrowed border and do I need one?
A merrowed border is a classic, thick wrapped edge that rolls over the fabric to prevent fraying. It’s the traditional choice for standard shapes like circles, squares, and shields. You need one if you want that iconic, raised frame look. If your design features a complex or irregular silhouette, a laser-cut edge is a better fit. This method uses heat to seal the fabric exactly to your unique shape for a modern finish.
Are custom patches durable enough for work uniforms or scrubs?
Custom patches are exceptionally durable and built to withstand the rigors of industrial laundering. We use sturdy twill bases and high-quality polyester threads that resist fading and shrinking, even when applied to embroidered scrubs or heavy work uniforms. Understanding how to design a custom patch for embroidery includes selecting these professional-grade materials. When applied correctly, these patches serve as lasting vessels for your professional story, maintaining their vibrant color and texture for years.